The Set-up
My roommate's Barnes and Noble NOOK had a broken screen. We suspect her kid siblings stepped on it at some point. I reminded her I had fixed my nook before, and she agreed to let me have a go at hers.
The hard part was finding the screen, but with just the right search terms, I found a seller on eBay that had a bunch of them. The seller is bcd-parts, and product page is here: eink screens for n1e, kindle 2,etc.
Disassembling the NOOK
As with every e-reader I've seen, the nook is mostly held together with clips. The back cover is made to pop off without any tools, and the battery comes out with the removal of one screw.

Removing the Face Plate
From there, we remove the face plate, which is held on by clips and sticky tape. The clips are a little more tricky than on the back cover. In the picture above, I'm pulling the faceplate away from the chassis with my thumbnail. There is a clip that has to be pulled like that in the same place on both sides. The rest just pop off with a little prying from a thumbnail or screwdriver.

Removing the Back Plate
Now we have some screws to remove. All of the torx screws on the back have to be removed. The size is T5. If you're going to make a habit of working on electronics and Saturns like I do, you might want to get a full set of torx drivers. There are 10 of these screws, which I've highlighted in the image to the left.
The one on the bottom-left is tamper-evident. It might be possible to peel the layer off and replace it later, but I didn't bother trying since this nook is out of warranty anyway. Note that the battery should also be removed at this point.
Once you get all of the screws out, it's time to snap the back off. As with the rest of the device so far, there are clips around the edge holding the back plate to the chassis. For some reason, Barnes and Noble really wanted this piece held on tight.
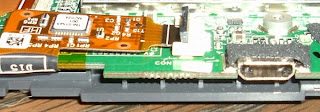
Removing the Motherboard

The headers all have latches that need to be folded up before they will release the cables. There is one each connecting the motherboard to:
- Left navigation buttons
- Right navigation buttons
- Screen
- LCD screen
- LCD touch panel
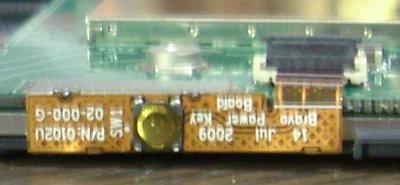
- Power button
There is also a connector for the speaker, but that doesn't have to be disconnected. The catch on each header is brown and flips up to open. This can be done with either a screwdriver or a thumbnail.

 |
 |

On the 3G nook, the 3G adapter may also have to be removed. The antenna connectors come off pretty easily (use pliers if necessary), and I think there are some obvious screws holding it in as well. It's been too long since I last had my own nook open to remember.
Once you have the ribbons disconnected from the headers, it's time to start popping the motherboard out, as you should be used to by now. Note that the body of the ribbon for the screen is stuck to the motherboard and will have to be peeled apart. If you are replacing another piece like the LCD screen, however, you could fold back the motherboard without that step. Don't try to force anything. If it feels like it's not coming, figure out what's catching before continuing.
Removing the Screen
Now that you've got the motherboard out, you should have a full view of the back of the screen. It is held into the chassis by tension in a metal frame. Gently pry the screen out of this frame. If you go slowly, you will find that you don't have to use much force. Again, for this portion, I've found that a thumbnail is the best tool, but a screwdriver may also be helpful.
Reassembling the NOOK
Assembly is the reverse of installation. That's sufficient information, right? I wouldn't do that to you folks. To reverse the steps, here's the order:
- Install the new screen and clip it into the metal frame.
- Clip the motherboard into place, making sure all of the connector ribbons are clear.
- Slide each ribbon into its header and clip it into place. I have found that it's sometimes difficult to get a new screen to clip in properly. You just have to wiggle it and play with it until it goes in absolutely straight. The white line on the ribbon should be nearly flush with the header. I would say less than 1mm apart. Remember to stick the ribbon to the adhesive on the motherboard so it doesn't rattle.
- For 3G nooks, reinstall the 3G adapter and connect the antenna.
- Clip the back plate into place and install all of the torx screws. Go around the edge of the plate and make sure the clips connect to the chassis.
- Clip the front plate on in the same manner, being sure to slide those funky side clips in the right way.
- Install the battery (don't forget the screw).
- Install the back cover.
- Inspect to make sure you got all the edge clips on tight. Separated clips will be pretty obvious.
- Boot it up!
Troubleshooting
If your nook has been broken for a while, odds are you haven't had it charging and the battery is beyond dead. When this happens, plug it into the wall charger and wait. The charging light should come on and stay on within a few minutes (max 15). If it doesn't, or it only flashes, something is wrong hardware-wise. One or two flashes usually means something is disconnected or not connected properly. Take it back apart and double-check the connections, especially with the screen. If the light doesn't come on at all, it's possible that you have a bad motherboard.
If the charging light comes on and stays on, but the nook doesn't start up, let it charge for a while. After a couple of hours, if it still won't start, perform the following procedure. Remove the nook from the charger. Remove the back cover and the battery. Hold the power button for 60 seconds to drain any residual power left in the system. Re-install the battery. Plug the charger back in and let it charge fully. This may take up to 4 hours. At some point in the charging process, the charging light should come on, and the screen will probably come on. If the charging light comes on, but the screen stays in whatever state you got it in, press and hold the power button for 20 seconds. The charging light should turn off while you are holding the button. Then, press the power button again to restart your nook.
Load it up!
Finally, you'll want to celebrate this victory by loading some new stuff onto your newly refurbished nook. Download some new books from B&N, and be sure to check out some screensaver and wallpaper images at ereaderbackgrounds.com.